
Mandatory Configurations
Managing multiple social media platforms in today’s digital landscape can be overwhelming without the right tools. Engage Engine is a robust platform that streamlines social media management by allowing users to connect their accounts and manage engagement in one place. However, before you can take full advantage of its features, you must configure your social media accounts correctly. This article will walk you through the mandatory configurations required to connect your social media accounts to Engage Engine seamlessly.
Why Configuration is Important
Proper configuration ensures a smooth and secure connection between Engage Engine and your social media accounts. It not only helps maintain data integrity but also ensures that all features, such as scheduled posts, analytics, and engagement tracking, function correctly. Failing to set up your accounts correctly can lead to errors, delays in posting, or even account disconnections.
It's essential for your activations to have direct access to your organization's social media platforms, as these will be the primary channels for sharing and promotions. Currently, Engage Engine supports six platforms.
Account Access Permissions
Prerequisites for Connecting Facebook
Before you connect your Facebook account to Engage Engine, there are a few key requirements:
Admin Access to a Facebook Page: Engage Engine connects to Facebook Business Pages, not personal profiles. You need to have admin or editor access to the Facebook Page you want to manage.
Up-to-Date Facebook Credentials: Ensure that you have the correct login details and admin permissions for the Facebook Page you wish to connect.
By going through Facebook Connect process, Engage Engine will be able to connect to your Facebook Messenger account to create the activations, and will also be able to measure the impressions and clicks on the posts that lead to Facebook Messenger activations.
This will help Engage Engine analyze and optimize the entire funnel of fans, from the first impression of the post to a full completion of the activation and sharing the data with you.
Engage Engine requires all permissions to be approved. Turning off one or more of the permissions might cause Engage Engine's platform to not perform as expected.
Sending Messages
To send a message to a fan, you can either trigger it automatically within an activation (e.g., responding to a keyword, link, or button) or manually send it to a group of fans from the Engage Engine platform.
24-Hour Rule: After a fan's initial interaction (message, keyword, link, button), you have a 24-hour window to send any message. This window resets with each fan response.
Account Updates: For urgent messages outside the 24-hour window, use "Account Update" tags. Avoid promotional content.
Notify Me Button: Ask fans to subscribe to specific notifications within the 24-hour window. You can send one message per topic for one year.
Sponsored Messaging: Use sponsored messages (similar to Facebook ads) to reach fans outside the 24-hour window if they haven't blocked your page.
One-Time Notifications
During a 24-hour conversation, you can ask fans to subscribe to specific notifications. If they agree, you can send one targeted message within a year. Once they respond to the notification, the 24-hour window resets.
Go to Page Settings: Access your Facebook Page settings.
Find Advanced Messaging: Locate the "Advanced Messaging" section.
Request Permission: If "One-Time Notification" isn't checked, click "Request."
Agree to Terms: Read and approve the terms of use.
Confirm: The "One-Time Notification" section should now have a green checkmark.
1. Grant Permissions to Engage Engine
Once you’ve logged in to Facebook, you’ll need to grant Engage Engine the necessary permissions to manage your Page. This step is essential for the platform to function correctly and provide access to all its features.
Here’s what you’ll need to allow:
Manage Pages: This permission allows Engage Engine to access and manage the content on your Facebook Page.
Publish Content: Engage Engine needs permission to post on your behalf, schedule posts, and edit content.
Access Insights: To track engagement and performance, Engage Engine requires access to your Page’s insights and metrics.
Make sure all permissions are enabled, then click Continue to proceed.
2. Select the Facebook Page You Want to Connect
If you manage multiple Facebook Pages, Facebook will display a list of the Pages associated with your account. Select the Page(s) you want to connect to Engage Engine.
Review the list of Pages.
Select the Page you wish to connect by clicking on the checkbox next to it.
Confirm your selection by clicking Next.
3. Confirm Connection and Finalize Setup
After granting permissions and selecting the Page, Engage Engine will finalize the connection process. You’ll receive a confirmation message indicating that your Facebook account is now successfully linked to the platform.
Review the information to ensure everything is correct.
Click Finish to complete the connection.
After granting permissions and selecting the Page, Engage Engine will finalize the connection process. You’ll receive a confirmation message indicating that your Facebook account is now successfully linked to the platform.
You should now see your Facebook Page listed under the Connected Accounts section in Engage Engine, confirming that the integration was successful.
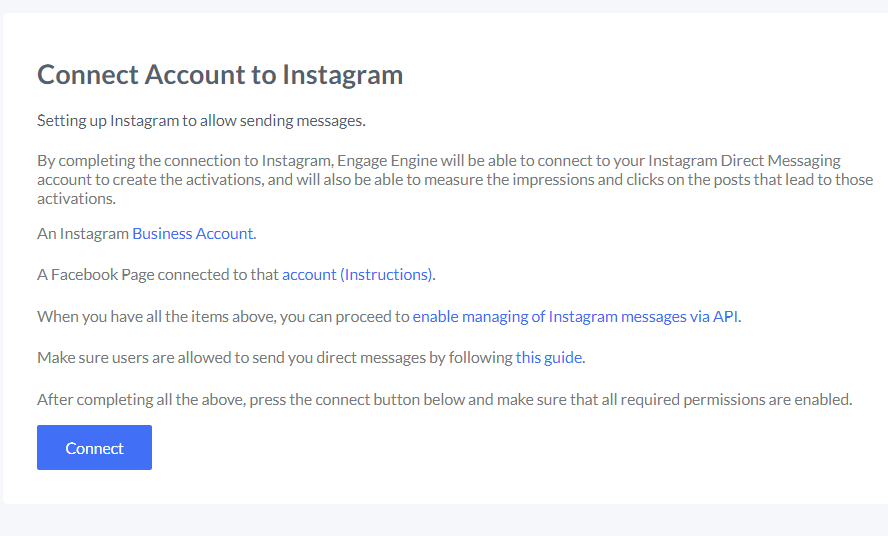
Prerequisites for Connecting Instagram
There are a few key requirements before you can connect Instagram to Engage Engine:
Instagram Business Account: Only Instagram Business Accounts can be connected to third-party platforms like Engage Engine. If you are currently using a personal account, you will need to switch to a Business Account.
Facebook Page Connection: Your Instagram Business Account must be linked to a Facebook Page. Since Instagram’s API is managed through Facebook, this connection is mandatory for authentication and account management.
1. Login to Your Facebook Account
Since Instagram’s API works through Facebook, you will need to log in to the Facebook account associated with your Instagram Business Page.
Enter your Facebook login credentials (email and password).
Click Continue to proceed.
If you manage multiple Facebook Pages, ensure that you are selecting the correct Page linked to your Instagram Business account during this step.
2. Grant Engage Engine the Necessary Permissions
Once logged into Facebook, you’ll be prompted to grant Engage Engine various permissions. This step is important because it ensures Engage Engine has the right level of access to post, manage comments, and gather analytics.
You will see a list of permissions Engage Engine requires, such as:
Post on your behalf
Access your Instagram profile and insights
Manage comments and direct messages
Make sure all permissions are enabled, then click Allow or Continue.
3. Confirm Instagram Account Connection
After granting permissions, Engage Engine will automatically detect your Instagram Business Account. You will need to confirm that the correct account is being connected.
Review the Instagram account shown on the screen.
If correct, click Confirm.
If you manage multiple Instagram accounts, ensure that you are connecting the correct one. You can always go back and switch accounts if needed.
Once confirmed, the connection process will be finalized. You will see a success message indicating that your Instagram account is now connected to Engage Engine.
Prerequisites for Connecting Twitter
Before starting the connection process, ensure you have the following:
A Twitter Account: Make sure your account is active and you have the login credentials handy.
Correct Permissions: If you are managing a business or brand account, ensure that you have full access to the Twitter account to authorize third-party platforms like Engage Engine.
Connecting your Twitter account to Engage Engine is only a few clicks process.
By going through Twitter Connect process, Engage Engine will be able to connect to your Twitter DM account to create the activations, and will also be able to measure the impressions and clicks on the posts that lead to Twitter DM activations.
This will help Engage Engine analyze and optimize the entire funnel of fans, from the first impression of the post to a full completion of the activation and sharing the data with you.
Important: You will need an Admin privilege in order to connect your account to Engage Engine.
Engage Engine requires all permission to be approved. Turning off one or more of the permission might cause Engage Engine's platform to not perform as expected.
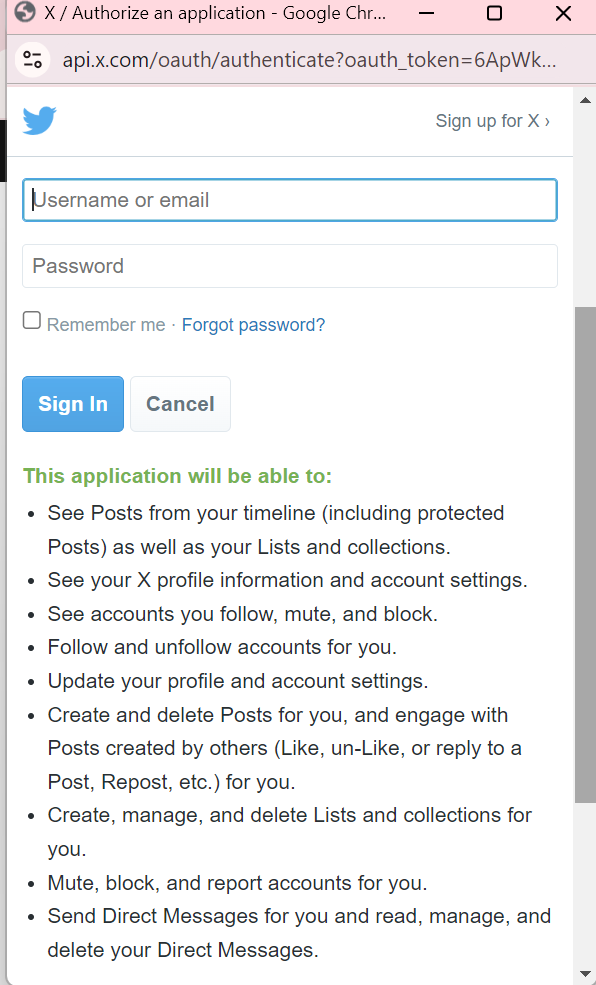
1. Authorize Engage Engine to Access Your Twitter Account
Once you select Twitter, a new window will open, prompting you to log in to your Twitter account.
Enter your Twitter username or email and password.
Click Authorize App to grant Engage Engine access to your account.
Engage Engine will request several permissions, including the ability to post tweets, access direct messages, and retrieve analytics data. These permissions are necessary for Engage Engine to manage your account effectively.
2. Verify the Twitter Account You Want to Connect
If you manage multiple Twitter accounts, you’ll need to ensure that the correct account is being connected. Review the account details displayed in the window, and confirm that it is the one you want to link to Engage Engine.
Double-check the username of the account listed.
If correct, click Authorize.
3. Complete the Connection Process
After authorizing Engage Engine to access your Twitter account, you will be redirected back to the Engage Engine platform. A confirmation message will appear, indicating that your Twitter account has been successfully connected.
You will now see your Twitter account listed under the Connected Accounts section in Engage Engine.
Click Finish to finalize the process.
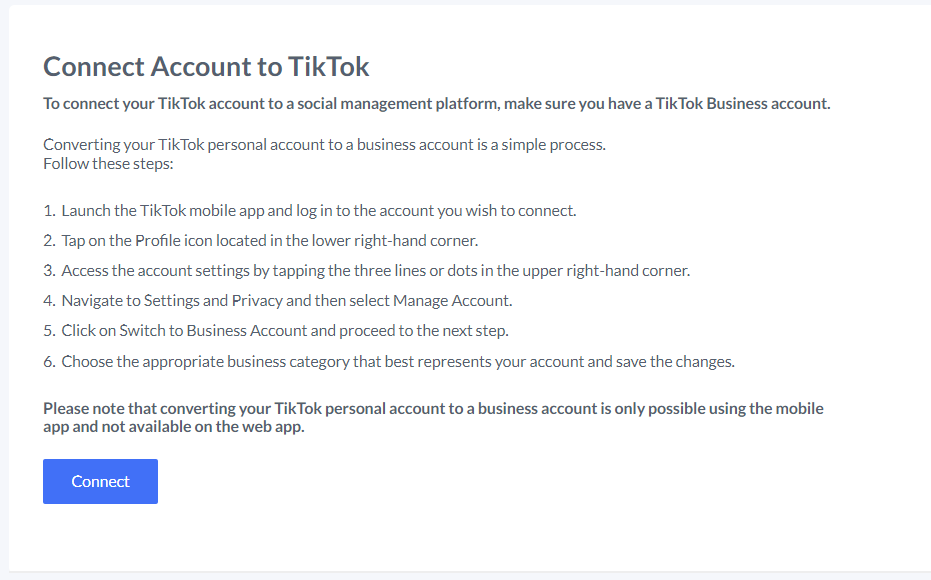
TikTok
Prerequisites for Connecting TikTok
Before starting the connection process, ensure you meet the following requirements:
TikTok Business Account: Engage Engine supports TikTok Business Accounts. If you are currently using a personal TikTok account, you will need to switch to a business account. This provides access to analytics and other features essential for third-party integration.
Correct Credentials: Ensure you have the correct login information for your TikTok account, and that it is linked to an active email address or phone number.
Once you’ve confirmed these details, you can proceed with connecting your TikTok account to Engage Engine.
1. Log in to Your TikTok Account
A new window will open, prompting you to log in to your TikTok Business account:
Enter your TikTok username and password.
If you have Two-Factor Authentication (2FA) enabled, you’ll need to enter the verification code sent to your phone or email.
Once logged in, click Authorize to allow Engage Engine to access your TikTok account.
2. Grant Permissions to Engage Engine
Engage Engine requires specific permissions to manage your TikTok account effectively. You will be asked to grant the following permissions:
Post Content: Allow Engage Engine to schedule and post TikTok videos on your behalf.
Access Insights: Enable Engage Engine to track performance analytics, such as views, likes, and comments.
Engagement Management: Allow Engage Engine to manage likes, comments, and shares on your videos.
Make sure all permissions are enabled, then click Continue or Allow.
3. Confirm TikTok Account Connection
After granting permissions, you will be redirected back to Engage Engine, where your TikTok account will now appear as connected. A confirmation message will indicate that your account has been successfully linked to Engage Engine.
Verify that your TikTok account is listed under the Connected Accounts section.
Click Finish to complete the process.
Test the Connection
Once the connection is established, it’s a good idea to test the integration by scheduling or publishing a post from Engage Engine to ensure that everything is functioning properly.
If the post appears as expected, your account is fully integrated with Engage Engine, and you can begin using the platform to manage your content and engagement.
Configuring your social media accounts to connect with Engage Engine is essential for maximizing the platform's capabilities. You can ensure that your accounts are securely and seamlessly integrated.
Engage Engine will help you streamline your social media management efforts, enabling you to focus on creating and engaging with your audience rather than dealing with technical issues.